What this chapter covers
Messenger connects DPA events with user notifications. A message can be delivered through Web, Email, SMS, Telegram, or Yandex. The source determines when a notification is required and who should receive it; Messenger accepts the prepared message, organizes delivery through the selected channel, and stores the result.
This chapter follows the entire message path in sequence: the event source, Message template, recipient users and their contacts, creation of a Messenger message, individual deliveries, web notifications, the queue, and delivery history. Configuration of the production events themselves remains in the corresponding chapters of this guide; here the important point is what happens after such an event is supposed to notify a person.
Messenger is a separate DPA microservice. Before you start, make sure that the microservice is installed, connected to DPA Host, and synchronized as described in the DPA Installation and Operations Guide.
1. Messenger: from an event to a recipient
An automatic message does not originate inside Messenger itself. For example, a Signal can have a notification handler configured, while Tickets can have notification rules for required stages and events. Such configuration determines the Message template, recipient users, and delivery channel. DPA Host obtains values from the source event, substitutes them into the template, and passes the prepared message to Messenger.
Messenger therefore does not decide whether a Signal should fire or whether a Ticket has changed. Its job begins after the decision to send has already been made: create separate deliveries for the required recipients, pass them to the appropriate transports, and store the results.
We will distinguish three closely related concepts in this chapter.
Messenger message contains the prepared notification text: source, subject, body text and, when provided, additional data and attachments. One message can be intended for several recipients.
Delivery belongs to one particular recipient and channel. For each delivery, Messenger stores the user, address or other contact, transport, queue time, and processing result. One message can therefore have several deliveries with different results: for example, a message may already be delivered to one recipient while delivery to another has failed or is still queued.
Web notification is the result of a successful delivery through the Web channel to a DPA user. Web does not require a separate external address: the recipient is the user account itself. After delivery, the notification appears in DPA under the notifications icon in the top bar. Email, SMS, Telegram, and Yandex instead use a suitable user contact; these contacts are configured separately in section 3, “Recipients and user contacts”.
The number of deliveries does not necessarily match the number of selected users. If one user has several suitable contacts for an external channel, the message can get a separate delivery for every such address. A DPA user and a concrete delivery address are therefore different parts of the model.
Message and its deliveries in history
Open Applications menu → Messenger and go to Message history. At the top of the page, Queue size, Delivery errors, and Succefully delivered counters are shown; each of them counts individual deliveries rather than unique messages. Display as lets you view the history in two ways:
- Messages — source messages with Source, Subject, Text, and Created at columns. Expand a message row to see the deliveries created for it;
- Deliveries — a common list of individual deliveries regardless of the message to which they belong.
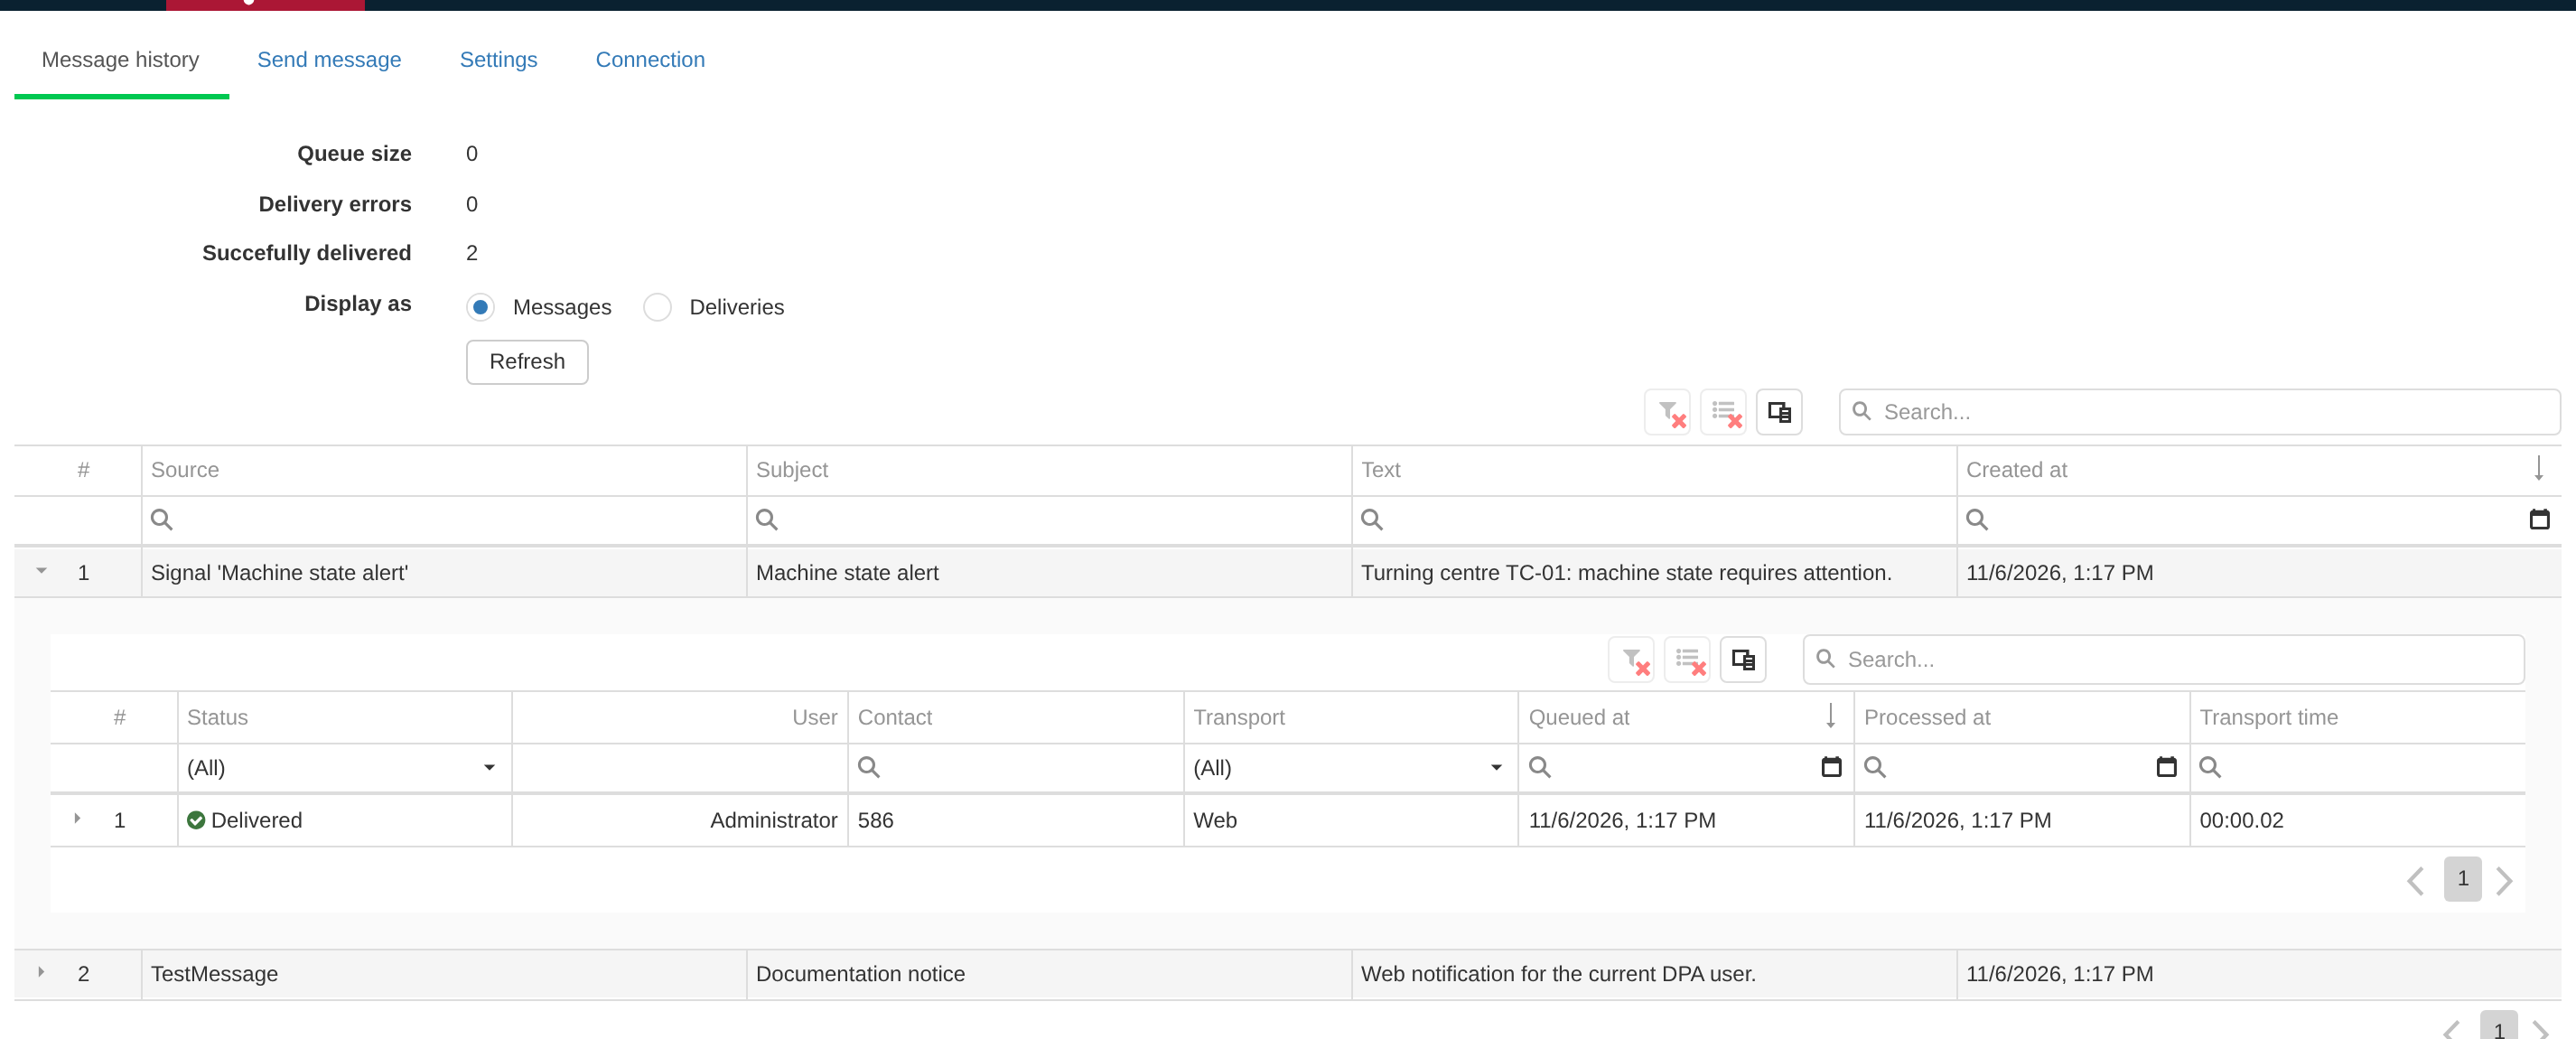
In Messages view, a source-message row expands to individual deliveries. Messenger shows a separate status, user, contact, transport, and processing time for each delivery, so the message itself and the result of a particular delivery are considered separately.
For each delivery, history separately shows Status, User, Contact, Transport, creation and processing times, and transport time. This distinction is especially important with several recipients: the state of an entire message cannot be inferred from one delivery.
When Messenger accepts a message, it first stores the message and creates its deliveries in the queued state. Each delivery is then processed by the corresponding transport. After processing, history stores the final delivery state — successful or failed; deliveries that have not yet been processed remain queued.
For Web, a successful delivery additionally creates a user web notification. Message history and the user’s Notifications list therefore answer different questions. Messenger history shows what the system attempted to deliver and how each delivery ended. Notifications show what a particular user received inside DPA.
The complete path of an automatic notification is therefore:
- an event occurs in DPA for which a notification is configured;
- the source selects a Message template, users, and channel;
- DPA Host substitutes source-event values into the template;
- Messenger stores the prepared message;
- separate deliveries are created for particular recipients and addresses;
- the transport processes each delivery and stores its result;
- for the Web channel, the user additionally receives a web notification inside DPA.
The following sections examine individual parts of this chain: Message templates and value substitution, recipients and contacts, Web, external channels, and the queue and delivery history.
2. Message templates and values from sources
A Message template defines reusable notification text. It is stored in DPA Host and used by the message source — for example, a Signal handler or Ticket notification — before the prepared message is passed to Messenger. The template itself does not determine when an event occurs, who receives the message, or which transport is actually used.
Open Applications menu → Reference books → Message templates. The list shows Name, Description, Subject, Body, and Preferred transport. Add a new record to create a template; open an existing record to edit it.
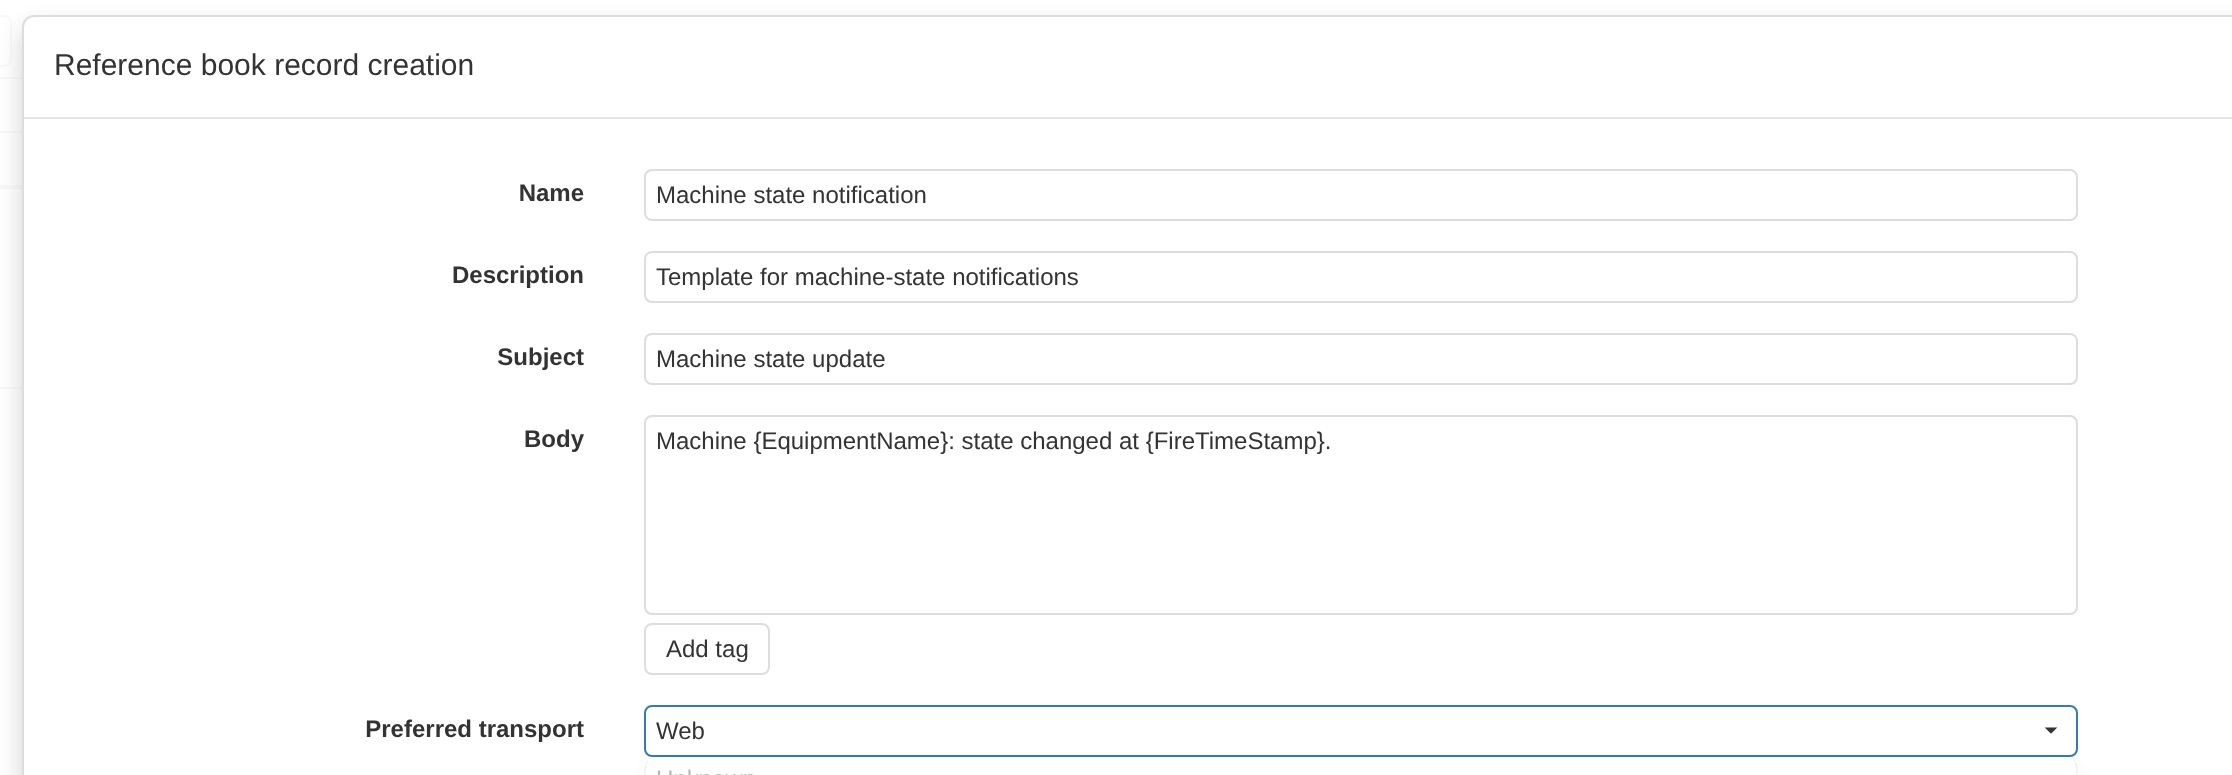
The Message template form stores the administrative name, description, message subject, and body. Preferred transport helps characterize the template, but the actual delivery channel is selected by the notification source.
Template fields have the following purposes:
- Name — the name by which the template is selected when configuring a notification source;
- Description — an explanation for the administrator; it is not included in the outgoing message;
- Subject — the short message subject. Substitution tags can be used in it;
- Body — the main multiline message text. Tags can also be inserted here;
- Preferred transport — a template characteristic. This field does not itself switch the delivery channel or prevent the template from being used with another channel. The actual transport is selected in the notification-source configuration.
Subject and body are text fields, not HTML or rich-text templates. Line breaks can be used to structure the message, while changing values are written as tags in braces, for example {EquipmentName} or {FireTimeStamp}.
Add tag applies to the Body field. It opens a selection dialog and inserts the selected tag into the message body. Tags in Subject are also processed, but their names must be typed manually together with braces.
Values supplied by the source
A tag is not an independent Messenger field. Before sending, the notification source builds a set of named values from the specific event, and DPA Host replaces corresponding tags in the subject and body. Only after this substitution are the prepared subject and text passed to Messenger.
The available values depend on the source and event type. For example, depending on its configuration, a Signal handler can provide information about the Work center, reason and fire time, device, Indicator, or event itself. Ticket notifications have their own values: ticket type, author, assignee, current stage, link, comment, and other information.
To see the tags known to the system, click Add tag.
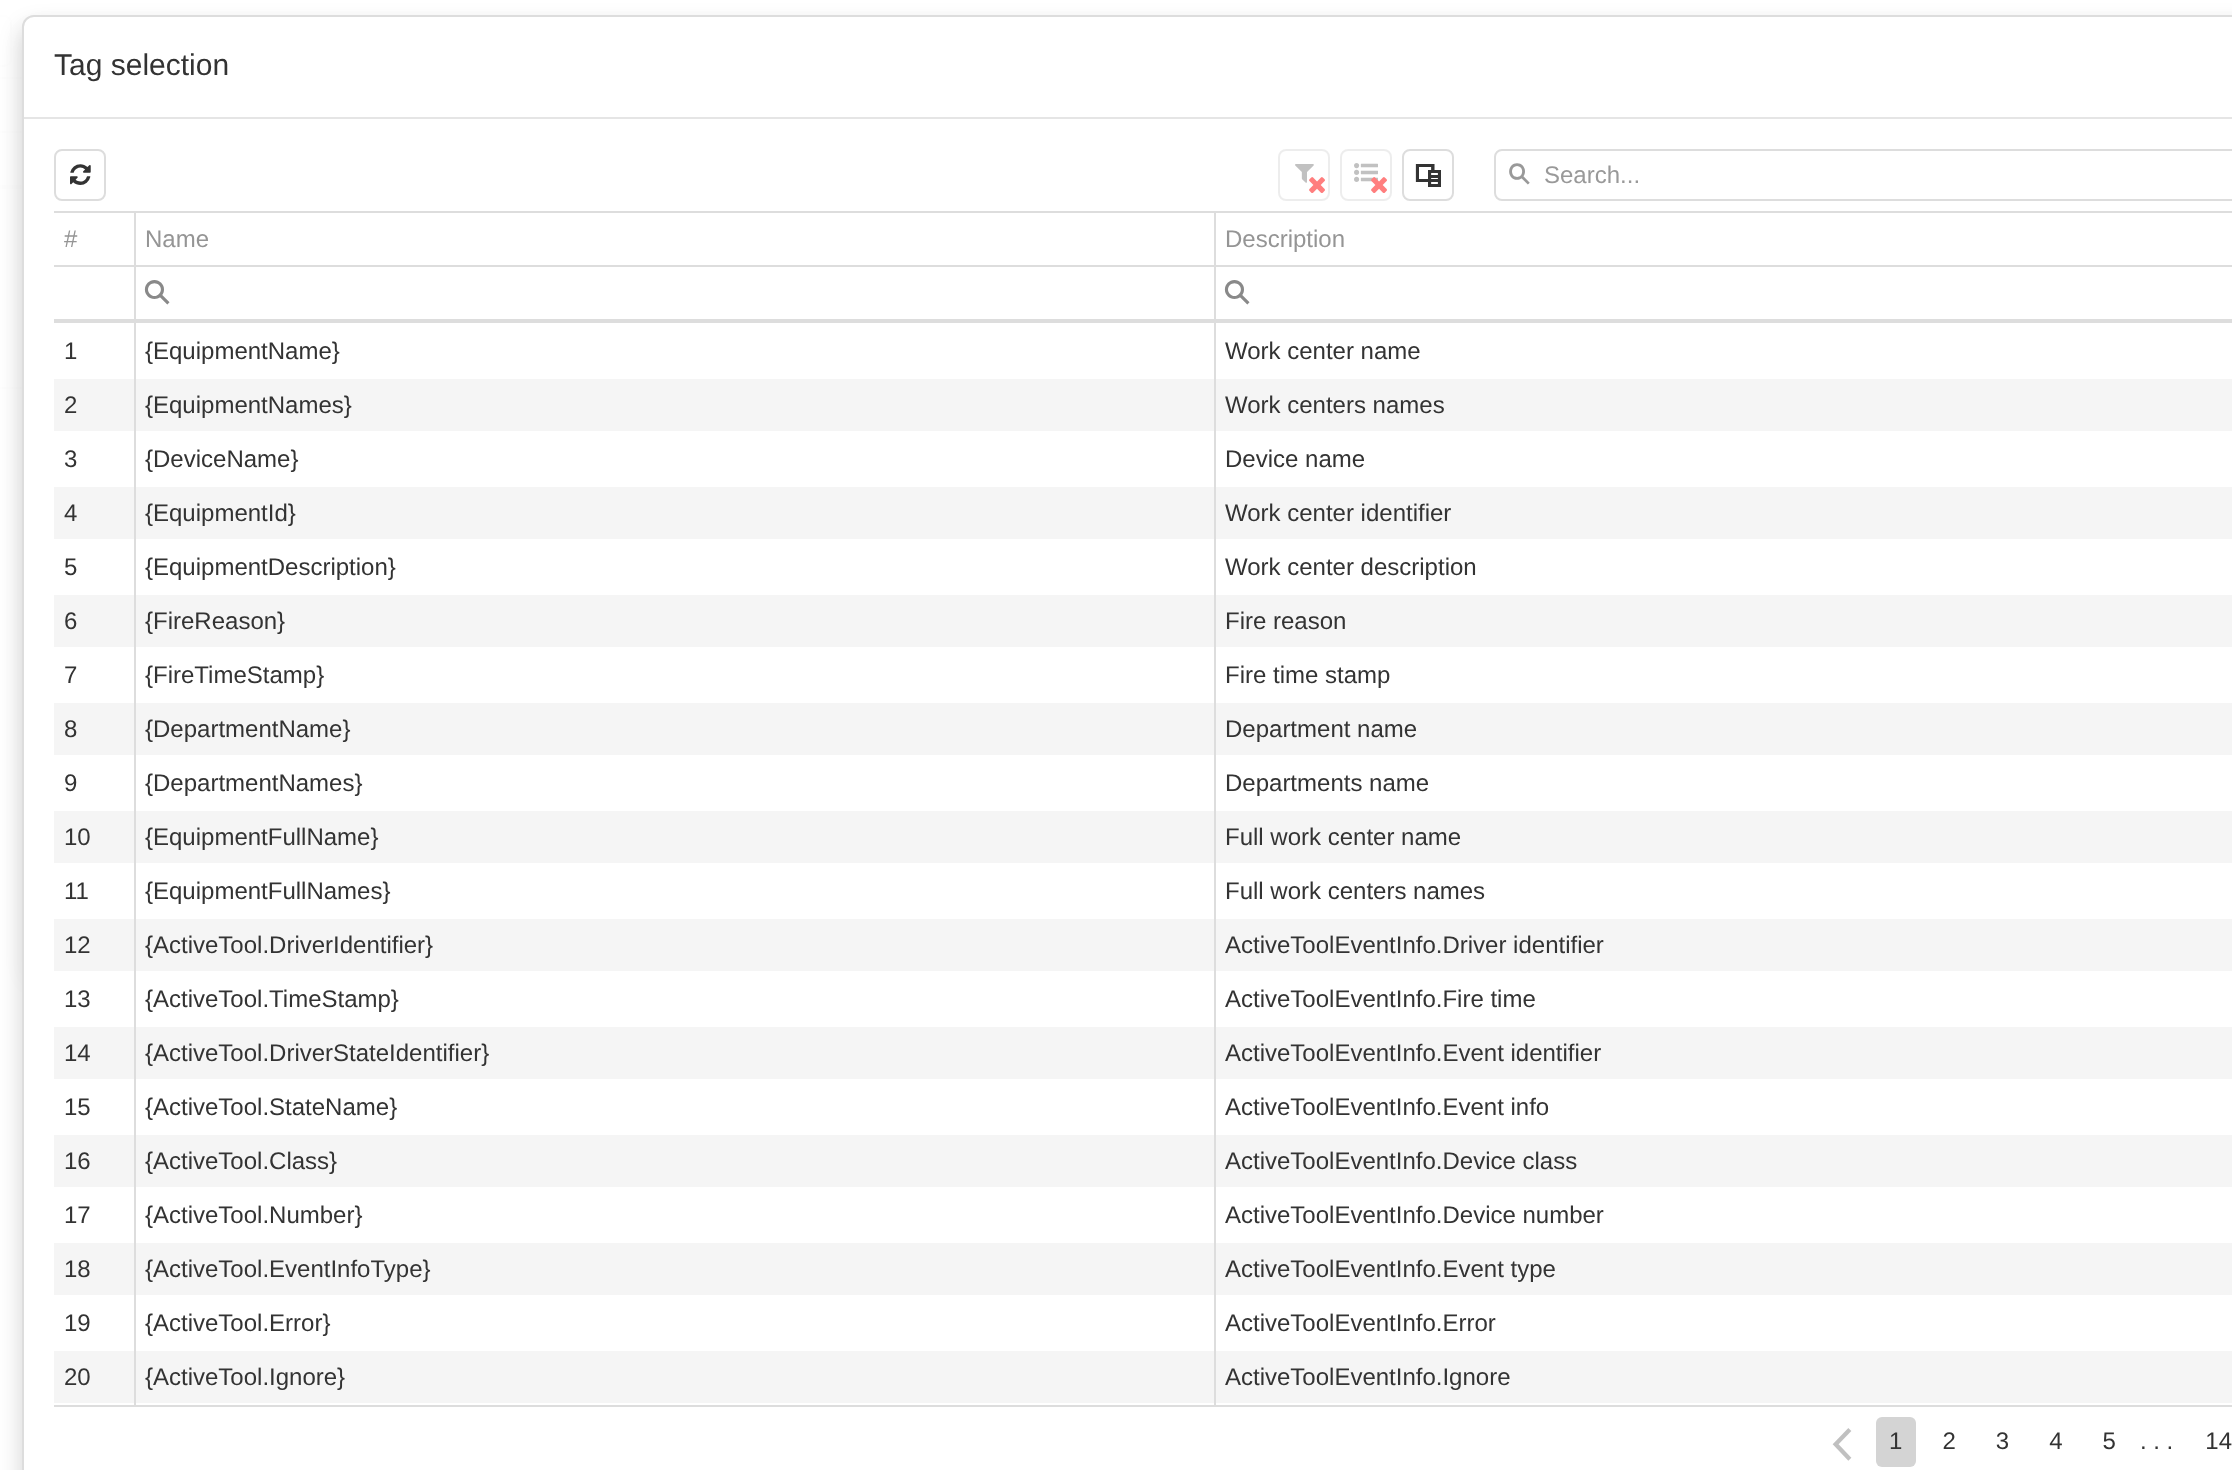
Tag selection shows the common substitution catalog known to DPA Host. The catalog is not filtered by notification source: use only tags for which the selected source actually supplies values.
The Tag selection dialog contains the common DPA Host tag catalog. It is not filtered by the source in which the template will later be used. A tag appearing in this list therefore means only that at least one system source supports it; it does not guarantee that the value is available in every notification.
For example, {EquipmentFullName} can make sense for a production-event message, while {Ticket.Type} applies to a Ticket notification. If a template uses a tag that the selected source does not provide, DPA Host cannot obtain a value for it. During message construction, such a tag is replaced with {empty}. The same value is used when a parameter was supplied but its string value is empty.
When configuring a template, therefore, check not only how the tag is written but also the context in which it is used. A practical sequence is:
- identify the notification source and event for which the message is being created;
- select only tags whose values are actually produced by that source;
- configure the source to use the template and required transport;
- trigger a test event and inspect the resulting subject and body. To test without an external delivery service, use the Web transport and inspect the result in Message history and the user’s Notifications.
Template localization
The name, description, subject, and body of a Message template are localized values. When creating a notification, DPA Host takes the recipient user’s language into account and prepares the text for the corresponding localization before passing the message to Messenger.
The Message template form has no separate localization selector. To fill in another language variant, switch the language in the user profile, then open Message templates again and edit the same template record. You do not need to create a separate template for every language. When a template is first created, the entered values are used for the supported localizations; afterward, each localization can be edited separately.
The text is not translated automatically: when several languages are used in the system, fill in the required variants in the corresponding UI localizations. If one notification is intended for users with different languages, DPA Host prepares the text separately for language groups. One source and one Message template can therefore produce messages with different localized subjects and bodies.
What is not part of a template
A Message template describes the text itself. Recipients, the actual delivery channel, and tag values come from the source configuration and context. Attachments are not stored in the template record either: when a particular source supports attachments, it adds them separately to the prepared message. For example, a Signal handler can attach a generated report when its configuration provides for that.
When troubleshooting a notification, it is therefore useful to distinguish two levels. If wording, a tag, or localized text is wrong, check the Message template and the set of values produced by the source. If the text is formed correctly but the message went to the wrong user, through the wrong channel, or was not delivered, the cause is in recipient selection, contacts, or delivery itself. Recipients and contacts are described in section 3, “Recipients and user contacts”, while delivery state is described in section 5, “Queue, state, and delivery history”.
3. Recipients and user contacts
A notification source selects DPA Users, not arbitrary addresses. For example, when configuring a Signal handler or Ticket notification, the Users field specifies the accounts for which the message is intended. Before passing the message to Messenger, DPA Host converts this list into concrete recipients for the selected transport.
At this stage, distinguish two things: the DPA user determines who the notification is intended for, while a contact determines where it should be delivered through an external channel. Web has no separate contact: the user account itself is the address.
User and delivery address
The delivery address is determined differently for each transport.
| Transport | How the recipient is determined |
|---|---|
| Web | DPA User account. No separate contact is required. |
| Every user contact of type Email. | |
| SMS | Every user contact of type Phone. |
| Telegram | Every user contact of type Telegram; its value contains the numeric Telegram chat id. |
| Yandex | Every user contact of type Yandex Messenger; its value contains the Yandex login. |
A user contact contains Type, Title, and Value. When preparing Messenger recipients, DPA Host matches the selected transport specifically to the contact type and uses its Value as the address. Title describes the contact and does not by itself affect address selection.
A user card also has other contact types, for example Chat, Web site, Social network, and Other. They can store useful user information but are not Messenger delivery addresses.
One user can have several contacts of the same type. For an external transport, each suitable value then becomes a separate recipient. For example, two Email contacts produce two separate Email deliveries to the same user. The number of deliveries can therefore be greater than the number of users selected in the notification source.
The opposite case matters as well. If a selected user has no contact of the required type for an external transport, no delivery address is produced. Such a delivery does not enter Messenger as a failed attempt: it is not created at all during recipient preparation in DPA Host. Keep this in mind when a user was selected in the source configuration but the expected delivery does not appear in Message history.
Web works differently. For every selected user, DPA Host creates a Web recipient directly from the account ID, so no phone number, Email, or other external address is required for a web notification.
Where contacts are configured
An administrator can open Settings menu → Security → Users, select the required user, and go to Contacts. Add contacts of the required types here and save the user card after changes.
A user can manage their own contact details through Profile → Contacts. Contacts are grouped by type in the dialog. The most important for Messenger are Phone, Email, Telegram, and Yandex Messenger.
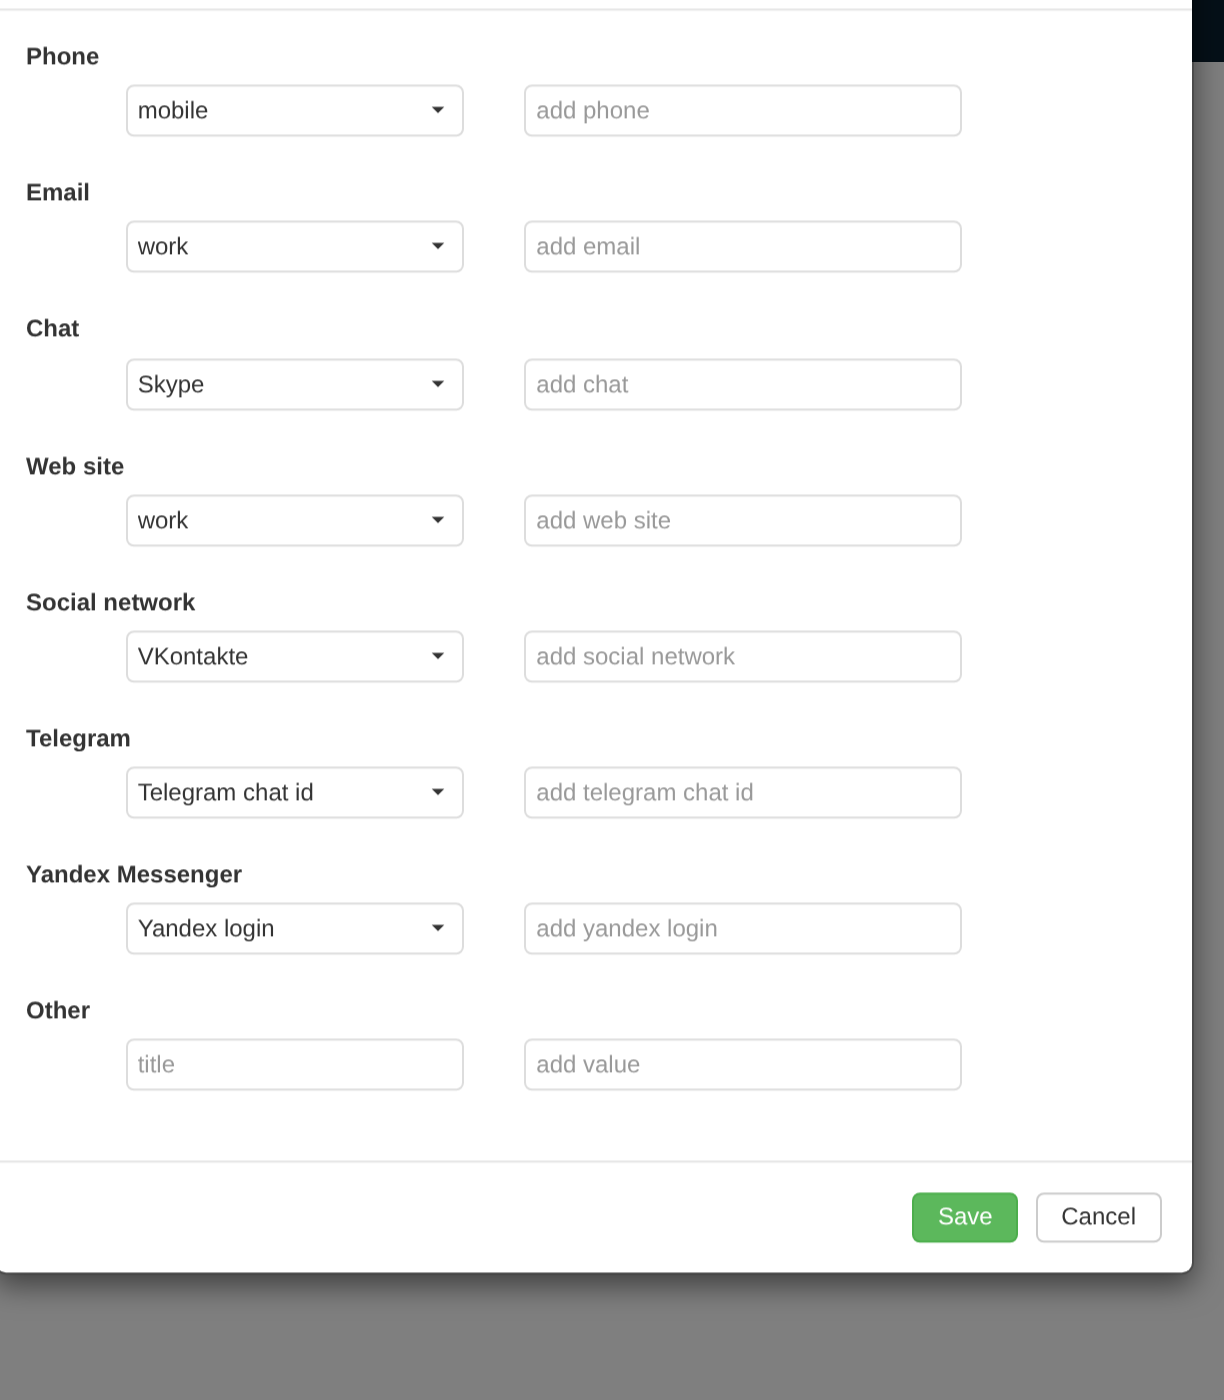
In Profile, contact details are separated by type. Messenger external deliveries use Phone, Email, Telegram, and Yandex Messenger; Web addresses the DPA account directly and does not require a separate contact.
Several values can be stored for one type. This is not a prioritized list of fallback addresses: when sending through the corresponding external channel, every matching contact becomes a separate recipient. Keep only addresses to which notifications should actually be sent.
Telegram and Yandex contact values have special formats:
- Telegram requires a numeric chat identifier; the UI field is labeled Telegram chat id;
- Yandex Messenger requires a user login; the UI field is labeled Yandex login.
Connecting Telegram
A Telegram contact can be entered manually when the correct numeric chat id is known, but for your own account it is more convenient to use the built-in connection flow. Open Profile and choose Telegram connection.
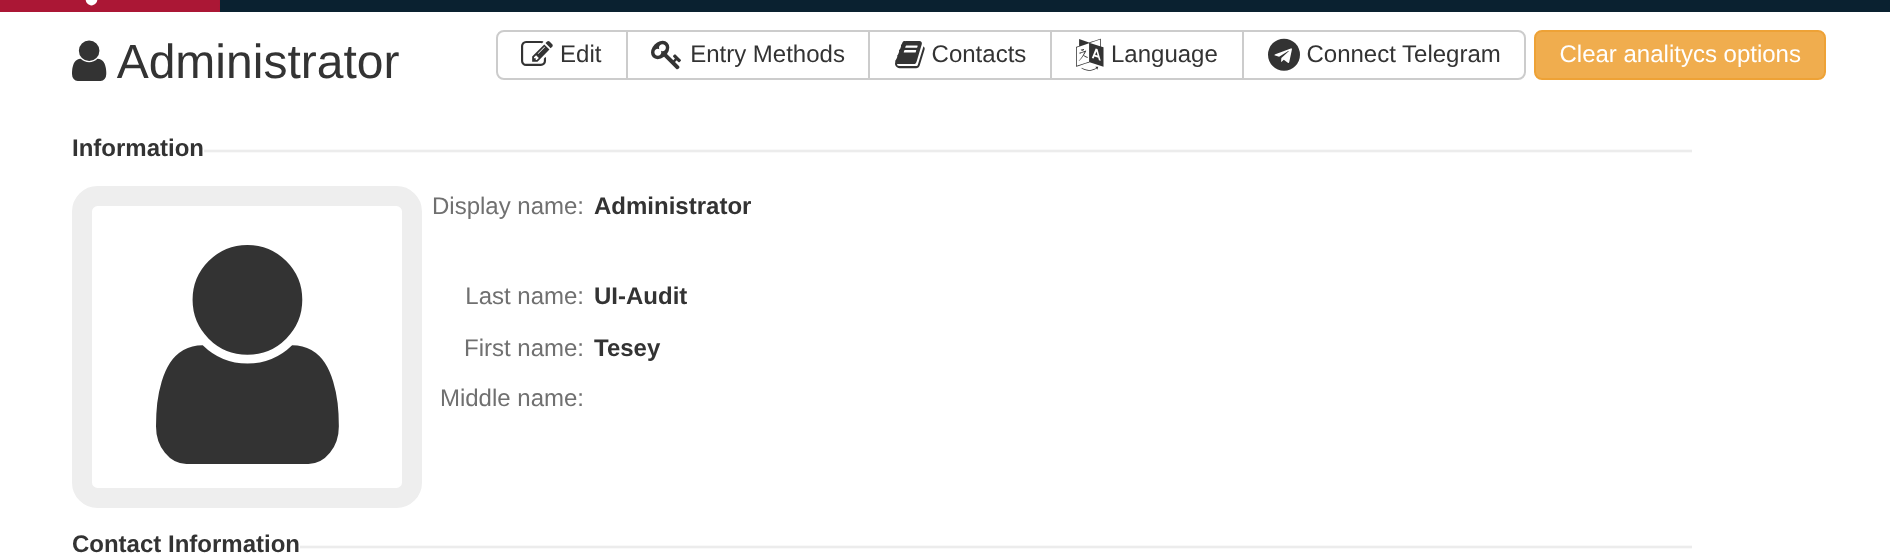
Profile provides a separate Telegram connection command. It creates a temporary Telegram-bot link for the current account; after the bot is started successfully, the user’s Telegram contact is added automatically.
If Messenger is available and the Telegram transport is configured, DPA obtains a Telegram-bot link from Messenger and shows it together with a QR code. The link contains a temporary token associated with the current DPA account. This token remains valid for 10 minutes.
Open the link or scan the QR code and start the bot. The /start command passes the token to Messenger; DPA Host then associates the received numeric Telegram ID with the current user and automatically creates a Telegram contact for that user. The user does not need to copy a confirmation code or determine the Telegram ID manually.
The link is one-time: after successful connection, its token is removed. If the 10 minutes expire before connection, create a new link with Telegram connection and repeat the process. If DPA cannot obtain a link, first check Messenger availability and Telegram transport configuration; transport settings are described in section 6, “Messenger: external channels”.
Yandex contact
Yandex has no separate QR-code or temporary-link connection flow. Add a Yandex Messenger contact to the user and enter the Yandex login in its value. When sending, Messenger passes this value to the Yandex transport as the recipient login.
Before testing an external notification, it is therefore useful to check in order that:
- the required User is selected in the source;
- the user has a contact of the type required by the selected transport;
- Value contains a real address, phone number, Telegram chat id, or Yandex login;
- the number of same-type contacts matches the expected number of deliveries.
For Web, the second and third steps are not required: the DPA account itself is the recipient. This makes Web convenient for testing the chain “source → template → user → Messenger” without configuring external services. The complete user-side Web notification cycle is described in section 4, “Web notifications”.
4. Web notifications
Web is DPA’s internal delivery channel. After a successful Web delivery, Messenger creates a notification for the user account specified as the recipient. No phone number, Email, or other external contact is required.
Users see their web notifications under Notifications in the DPA top bar. The number next to the bell shows the unread notification count for the current account. Click the icon to open Notifications.
A user notification stores the message body, creation time, viewed state and, when supplied by the source, additional context for navigating to related data. The original message Subject is not shown in this list; it can be seen in Messenger Message history. Attachments are not displayed in the user’s Web notification list either.
Notification list and viewed state
Notifications contains three main columns:
- Date of creation — when the web notification was created;
- Viewed — whether the notification has already been loaded for the user in the list;
- Message — the body of the delivered message.

Notifications in the top bar opens the current user’s web-notification list; the number next to the bell shows the unread count. The list shows creation time, the Viewed state, and message body.
A row does not have to be opened separately to mark it as viewed. When the table loads a page of data, all notifications on that page are automatically marked as viewed. The action therefore applies to the loaded set of rows, not to the entire accumulated list at once.
For example, if there are 25 unread notifications and the page size is 20, opening the first page marks 20 rows as viewed. The remaining five on the next page remain unread, and the bell counter stays at five until that page is loaded.
The viewed state is written after the table receives its data. A newly loaded row can therefore continue to appear without a mark in the Viewed column until the next list refresh even though the unread counter has already decreased. Click Refresh to see the final row state.
Actions with web notifications
Select one or more rows in the table and remove them with Delete. Deletion applies only to the user’s web notification. The original Messenger message and its delivery information remain in Message history: Notifications and delivery history are different views of data.
Some notifications contain the Work center and period context from which the event originated. For example, a Signal handler associated with a Work center passes such context with a Web message. When one row with saved context is selected, Machine state becomes available. It opens a state chart in a new tab for the Work center and time interval stored in the notification.

When the selected notification contains Work center context, Machine state becomes available in the action bar. It opens the state chart for the Work center and period stored in the notification.
If the source did not supply such context, Machine state is unavailable for the selected notification. The absence of the command does not mean that delivery failed; it only means that the notification has no data for this navigation action.
Web notification and Messenger history
When checking delivery, compare two screens. Messenger Message history answers whether the message was accepted, which Web delivery was created, and how that delivery was processed. Notifications shows the result of that delivery from the perspective of a particular user.
A useful troubleshooting sequence is therefore:
- find the original message and its Web delivery in Message history;
- make sure that the delivery completed successfully and belongs to the required user;
- sign in as that user, open Notifications, and find the message text;
- if the notification is absent, confirm that history really contains a successful Web delivery to that exact user;
- if the notification exists but the counter or Viewed state looks unexpected, take the page-by-page automatic marking behavior into account.
Web is convenient for checking the whole Messenger chain without external services: it uses the DPA user as the recipient and stores the result inside the system. Section 5, “Queue, state, and delivery history” describes the internal Messenger queue, individual deliveries, and their final states.
5. Queue, state, and delivery history
After receiving a message, Messenger stores the message itself and creates a separate Delivery for every prepared recipient. Each delivery immediately receives the Queued status. The corresponding transport then processes it and stores the final result — Delivered or Error.
Open Applications menu → Messenger → Message history. Three counters are shown at the top of the page: Queue size, Delivery errors, and Succefully delivered. Despite the wording of the first counter, all three values count individual deliveries rather than unique messages. For example, one message with three recipients not yet processed increases Queue size by three.
Click Refresh to reread the counters and the current history table.
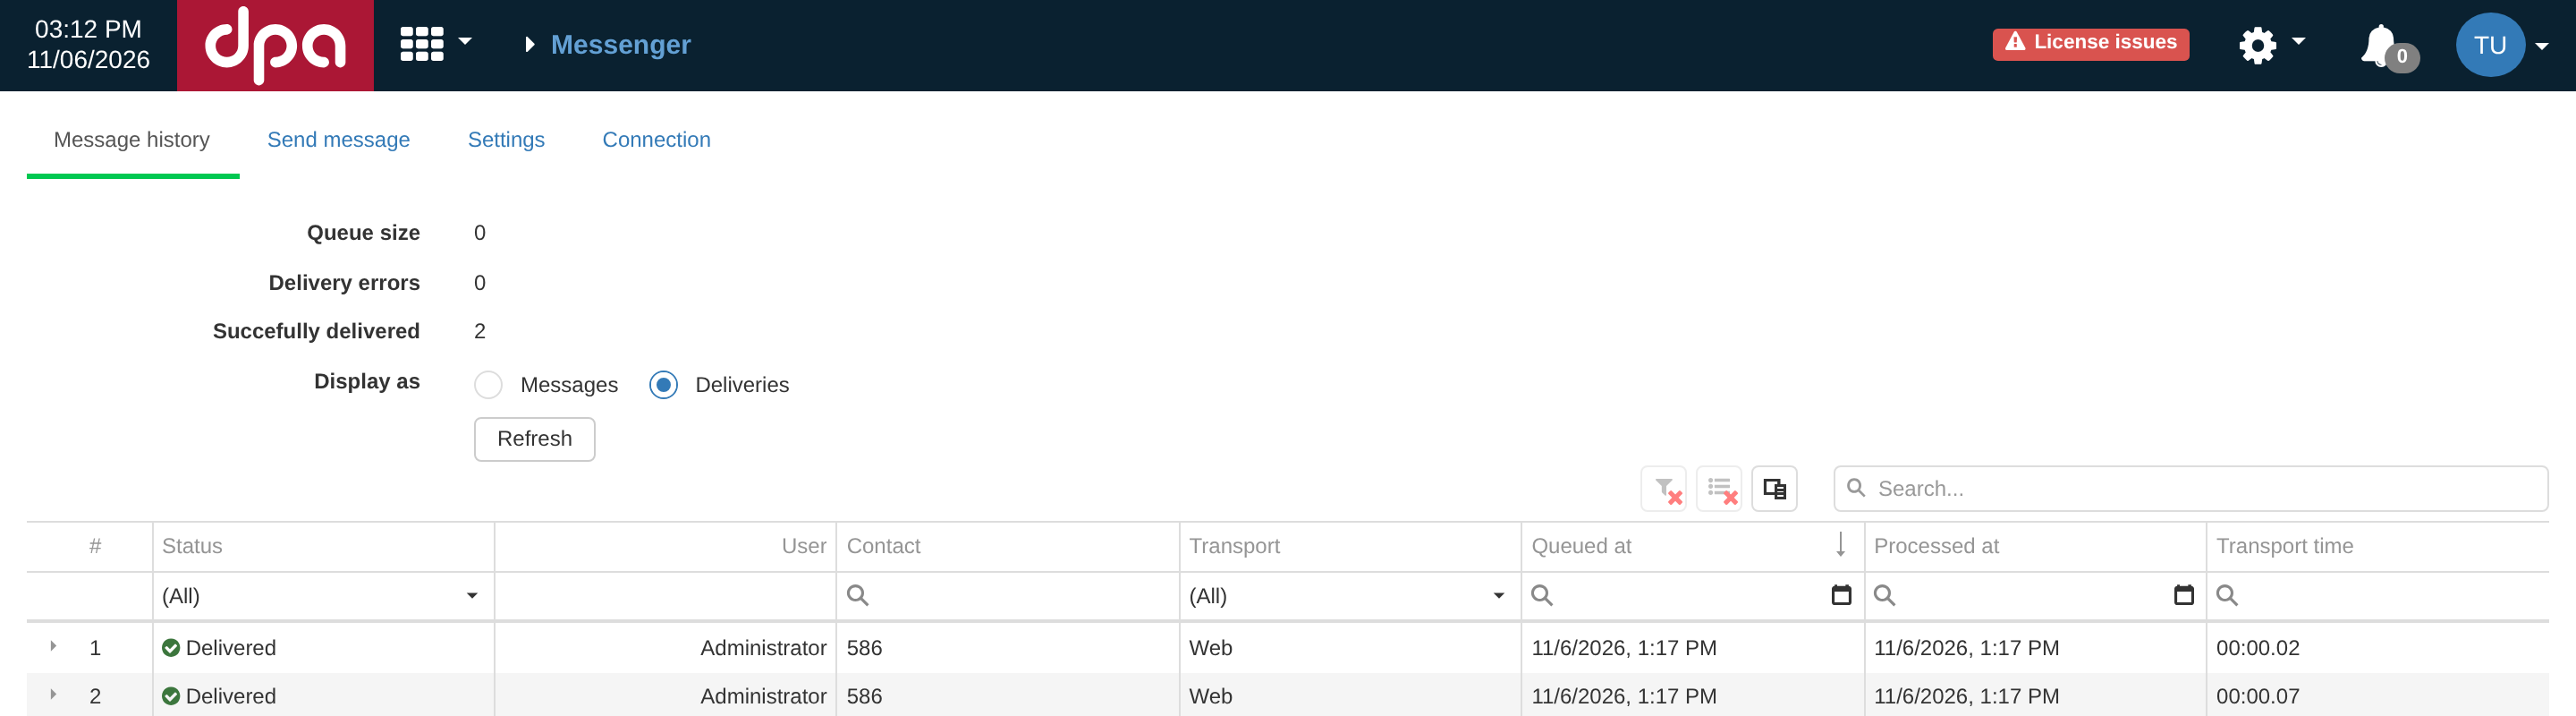
Deliveries view shows individual deliveries independently of their source message. For each delivery, status, user, contact, transport, creation and processing times, and Transport time are visible; the counters above the table also refer to individual delivery states.
Delivery states
The normal lifecycle uses three states.
| Status | Meaning |
|---|---|
| Queued | The delivery is stored but its final processing result has not yet been written. Created at is already populated, while Processed at remains empty. |
| Delivered | The transport completed sending without an error. Messenger stores the processing time and duration of the transport operation. |
| Error | The transport returned an error or completed with an exception while processing the delivery. The error text is stored with the delivery. |
Delivered describes the work of the transport. It does not mean that a person has read the message. For Web, a successful delivery means that a user web notification was created; its viewed state is tracked separately, as described in section 4, “Web notifications”. For external channels, the meaning of confirmation depends on the particular transport and is described in section 6, “Messenger: external channels”.
The Deliveries table has three time fields:
- Created at — when Messenger stored the delivery in the queue;
- Processed at — when the final result was stored;
- Transport time — the duration of the transport operation itself, stored separately by Messenger.
Do not calculate Transport time as the difference between Created at and Processed at. A delivery can remain in the queue for some time before processing begins, and internal transport retries are not represented as separate history rows either.
Expand a delivery row to inspect state details. For Delivered, Messenger shows successful-delivery confirmation; for Queued, the queue state; and for Error, the stored Delivery error text. Use this text as the first technical explanation for a failed send.
Messages and deliveries
Display as provides two views of the same history.
Messages shows the original messages. Each row contains Source, Subject, Text, and creation time. Expand a message row to see every delivery created for it. This view is convenient when you need to understand what happened to all recipients of one event.
Deliveries shows a flat list of individual deliveries independently of their source messages. This view is more convenient for looking for problems by status, contact, transport, or processing time.
Double-clicking a message or an individual delivery opens Message properties.
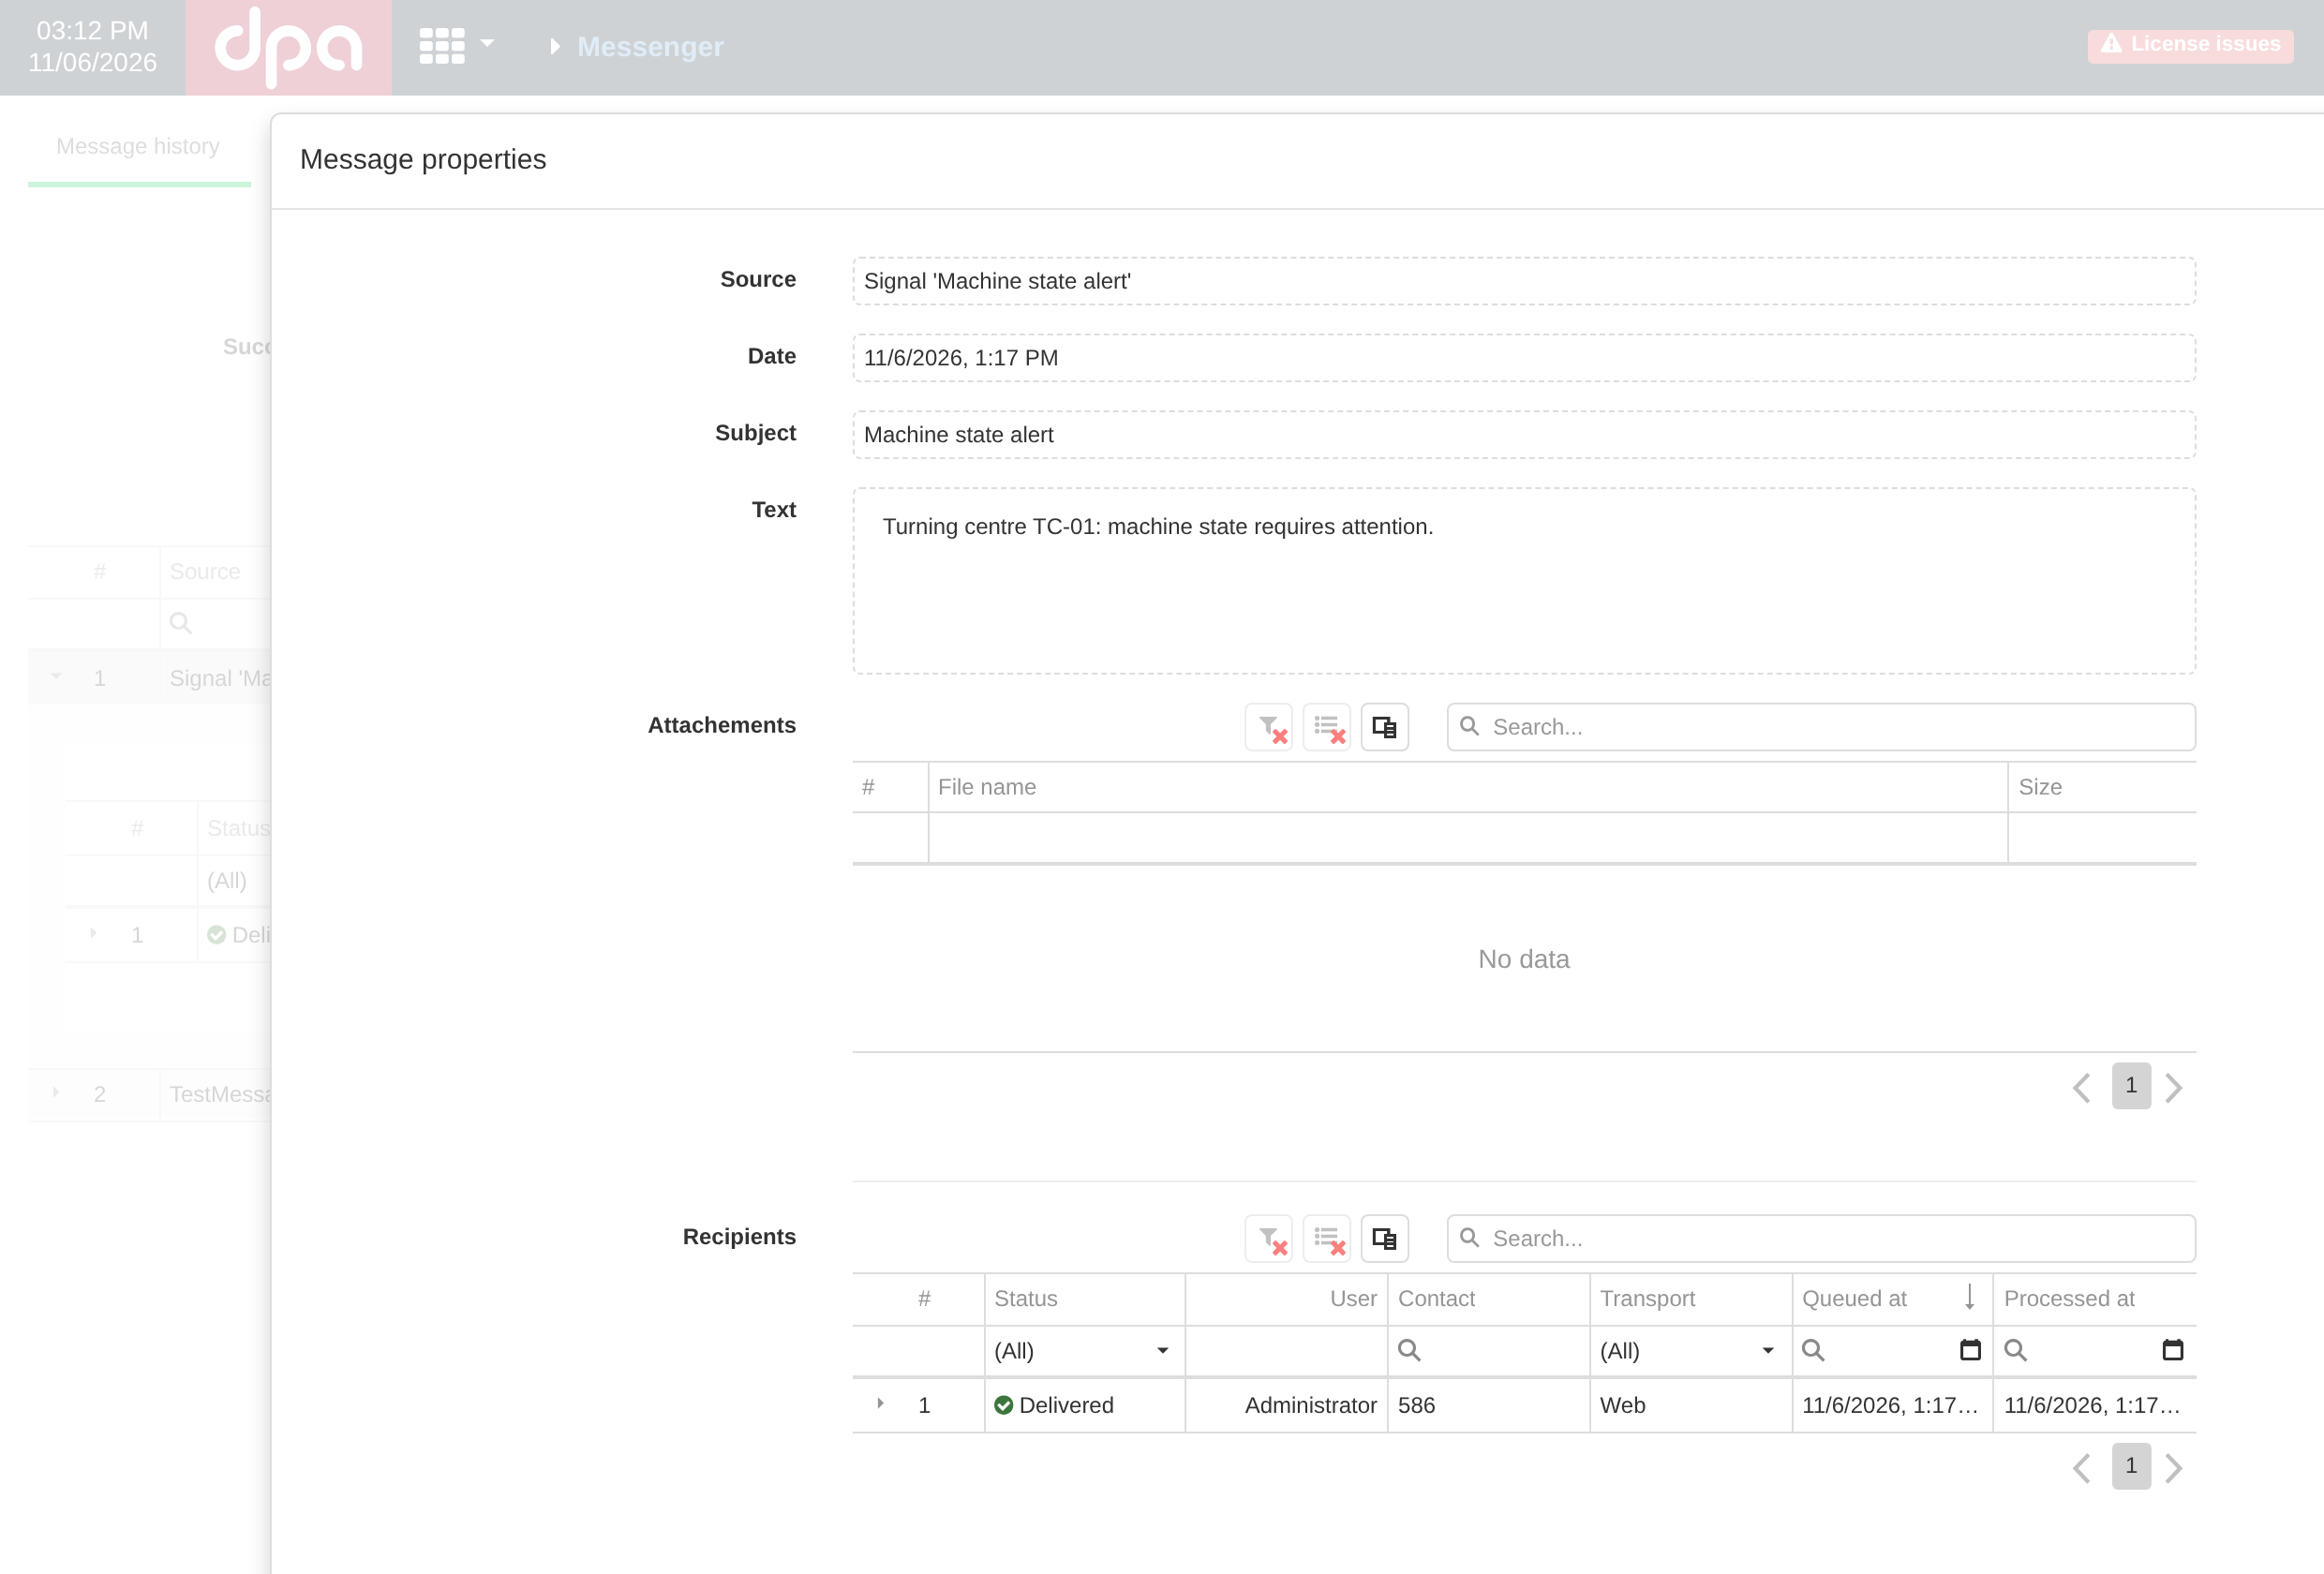
Message properties connects the source message with its deliveries: here you can check the source, date, subject, text, attachments, and recipient list with their statuses and transports.
The dialog lets you check Source, Date, Subject, Text, attachments, and Recipients. The recipient table shows the individual deliveries of the message and lets you compare one original text with results for different users, contacts, and transports.
What happens to a queued delivery
The Messenger queue has two related parts. First, a delivery is written to the database with the Queued status; only then is the message passed to the internal sending handler. The queued state therefore survives even if the Messenger process stops.
At startup, Messenger finds stored deliveries with the Queued status and passes them for processing again. This allows unfinished sending to continue after the service restarts. After successful processing, the status changes to Delivered; after a transport error, to Error.
Error is a final stored delivery state: the general Messenger mechanism does not automatically move such a row back to Queued. Message history also has no separate resend command. After the cause of an error is fixed, the message must be formed and sent again by the source that creates it, or sent again as a test message when checking the transport.
Individual internal operations can still perform their own retries before Messenger receives the final result. Such attempts do not create new rows in Message history: a delivery has no user-visible retry counter or separate log for each attempt. History retains one delivery with its current or final status, time, and, in case of failure, stored error text.
Reading history during troubleshooting
When an expected notification is missing, it is convenient to check the chain from top to bottom.
- Find the source message in Messages view. If it is absent, the cause is before Messenger — in the event, handler, or message construction.
- Expand the message and check whether a delivery was created for the required user. If it was not, return to recipient selection and contacts described in section 3, “Recipients and user contacts”.
- If a delivery remains Queued, click Refresh and check whether Messenger is operating. A state that persists for a long time means that the final processing result has not been written.
- If a delivery has Error status, expand it and read Delivery error. Then check the corresponding transport settings and recipient address.
- If a delivery has Delivered status, Messenger completed the transport operation without an error. For Web, continue in the user’s Notifications; for an external channel, follow the rules of the corresponding transport.
This separation prevents mixing together four different cases: no source message, no particular recipient, an unfinished queue operation, and a transport delivery that has already failed.
6. Messenger: external channels
Email, SMS, Telegram, and Yandex use the same message and delivery model described in the preceding sections. Only the last part of the chain differs: the transport receives the already prepared subject, text, recipient address, and attachments and passes them to an external system.
Transport settings are not on the Settings tab of the Messenger application itself. Open Applications menu → Messenger → Settings and follow Go to microservice settings for Messenger. The microservice card contains EmailerOptions, SmsOptions, RunDPAMessengerOptions, TelegramBotOptions, and YandexBotOptions tabs.
RunDPA Messenger and local sending
Before configuring individual channels, determine where Email, SMS, and Telegram deliveries should be performed. Open RunDPAMessengerOptions.

RunDPAMessengerOptions selects how external channels are processed. When UseRunDPAMessenger is enabled, Email, SMS, and Telegram are passed to the upstream RunDPA Messenger; Web and Yandex remain local.
UseRunDPAMessenger selects one of two modes.
- When UseRunDPAMessenger is enabled, Email, SMS, and Telegram deliveries are passed to an upstream service at RunDPAMessengerUrl. The local Messenger stores the message and deliveries but does not execute the corresponding external transport itself. Web notifications and Yandex continue to be processed locally.
- When UseRunDPAMessenger is disabled, Messenger performs Email, SMS, Telegram, Yandex, and Web deliveries itself. In this mode, the parameters on the other microservice-settings tabs are used for external channels.
When RunDPA Messenger is used, the local instance must be registered in the upstream service. Open Applications menu → Messenger → Connection, specify Organization name, and click Create request. After the registration is approved, Messenger uses the saved instance credentials to authenticate to the upstream service. This registration concerns external-message routing and does not replace the ordinary connection and synchronization of the Messenger microservice with DPA Host.
If RunDPA Messenger is unavailable, one operation that passes an external message can make several attempts to contact the upstream service before the delivery receives its final error. In Message history, these internal attempts are still represented by one delivery, as described in section 5, “Queue, state, and delivery history”.
Email delivery uses a user contact of type Email. For local sending, open EmailerOptions and configure the SMTP server.
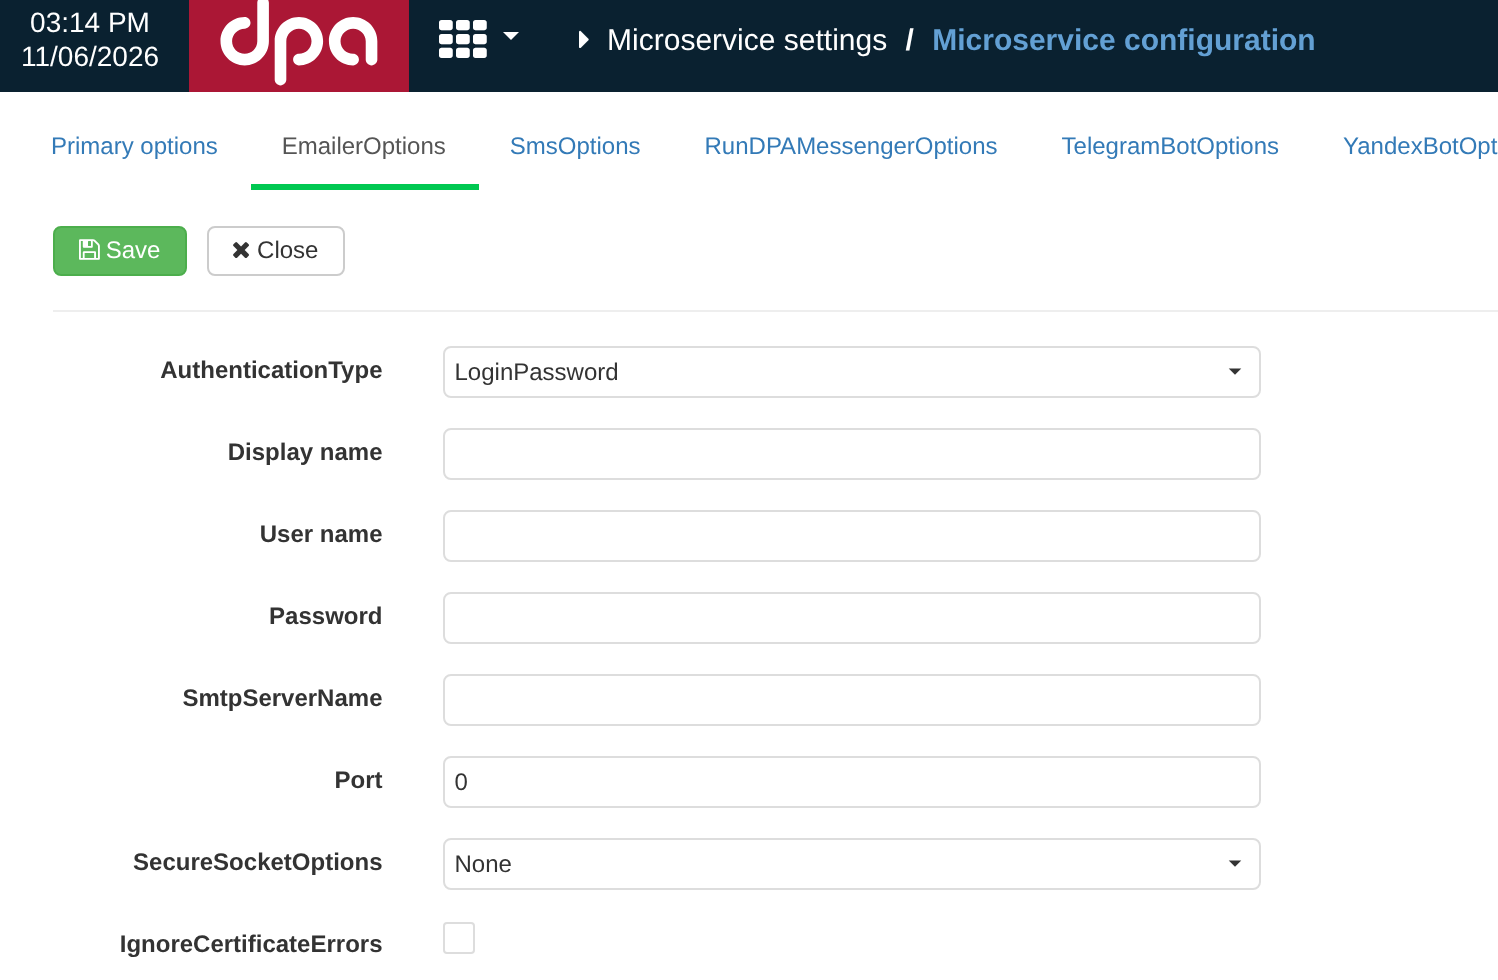
EmailerOptions contains the parameters for local SMTP sending: authentication method, sender, server, port, secure-connection mode, and certificate validation.
The main fields have the following meaning:
- AuthenticationType — authentication method:
LoginPasswordorAnonimous; - Display name — sender name shown next to the address;
- User name — the SMTP account and at the same time the sender address;
- Password — the account password when login/password authentication is used;
- SmtpServerName and Port — SMTP server address and port;
- SecureSocketOptions — secure-connection mode:
None,Auto,SslOnConnect,StartTls, orStartTlsWhenAvailable; - IgnoreCertificateErrors — disables certificate-error validation. Use this option only with a server you deliberately trust when normal certificate validation is not applicable.
For Email, the message subject is sent as the email subject, the body is sent as plain text, and attachments are added to the email as files. Delivered means that the SMTP operation completed without an error; it does not confirm that the recipient opened the email.
When UseRunDPAMessenger is enabled, local EmailerOptions do not participate in Email sending: the message goes to the configured RunDPA Messenger, and direct SMTP transport parameters are configured on the upstream server.
SMS
SMS delivery uses a user contact of type Phone. For local sending, SmsOptions allows one of four providers to be selected: Smtp, Http, Smpp, or GsmModem. After a provider is selected, its corresponding parameters are shown below.
| Provider | Main parameters |
|---|---|
Smtp | Mail-to-SMS gateway address, SMTP server and port, user name, password, display name, and SSL. The phone number is passed to the gateway in the email subject. |
Http | URL, GET or POST, body format FormUrlEncoded or Json, authorization method None, Basic, or UrlParams, and parameter names for recipient, message, user, password, and signature. |
Smpp | Host, Port, SystemId, password, and EnquireLinkInterval for the SMPP server connection. |
GsmModem | Serial-port number, BaudRate, and modem-operation timeout. |
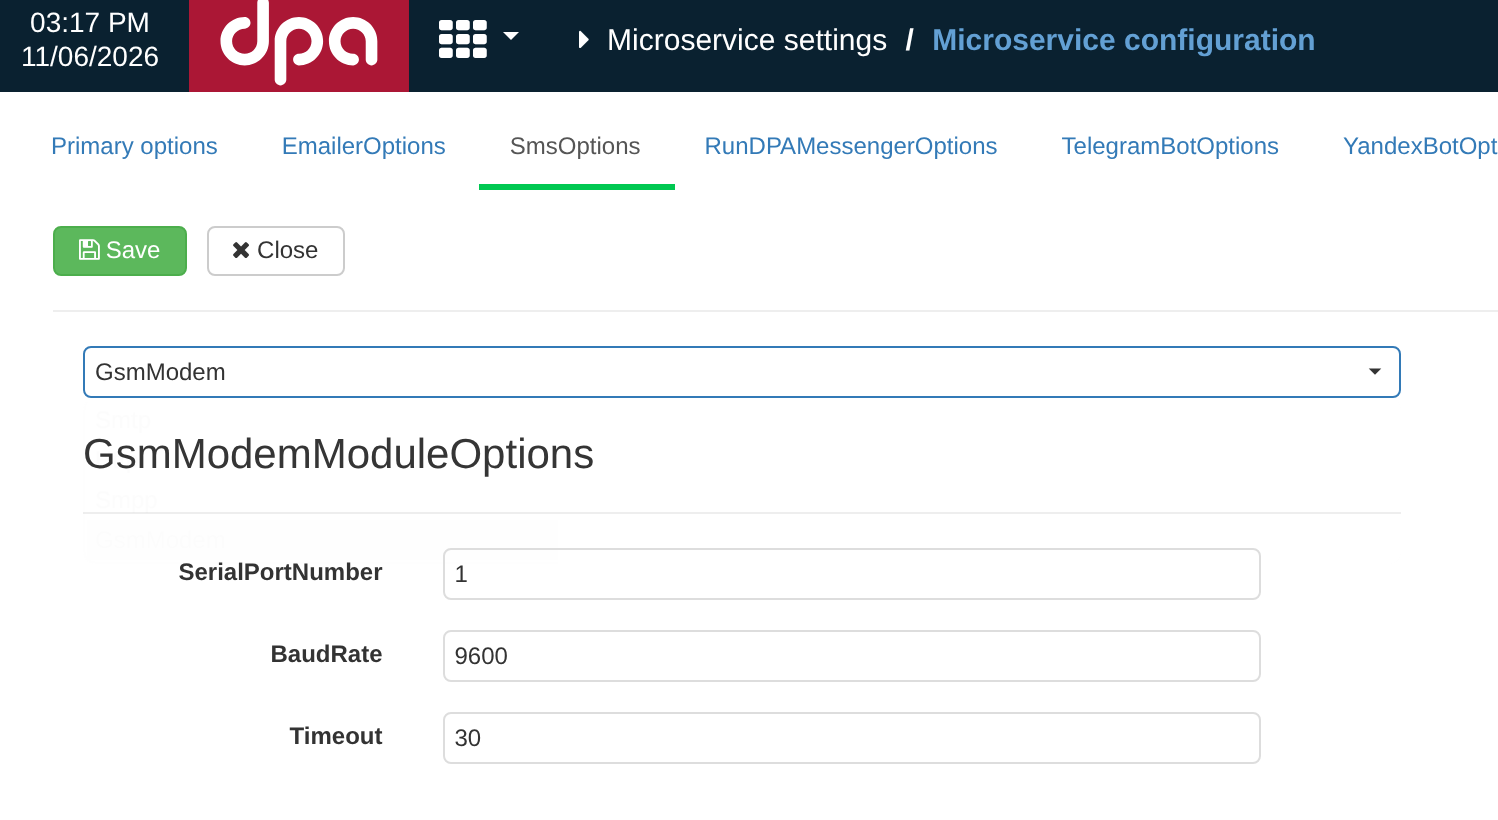
In SmsOptions, the available fields depend on the selected provider. For GsmModem, configure the serial port, baud rate, and timeout.
For SMS, Messenger combines subject and body into one text: the subject first, followed by a line break and the message body. Attachments are not passed to the SMS transport. The exact meaning of Delivered depends on the selected provider: Messenger considers the delivery successful when the sender in use completes its operation without an error.
Telegram
Telegram delivery is addressed by the numeric Telegram chat id stored in the user’s contact. The normal way to obtain this identifier through DPA is described in section 3, “Recipients and user contacts”, using Telegram connection in the user profile.
In local mode, TelegramBotOptions contains BotName and BotToken. BotName is used to build the bot link shown during user connection, while BotToken is used by Messenger to call the Telegram Bot API.
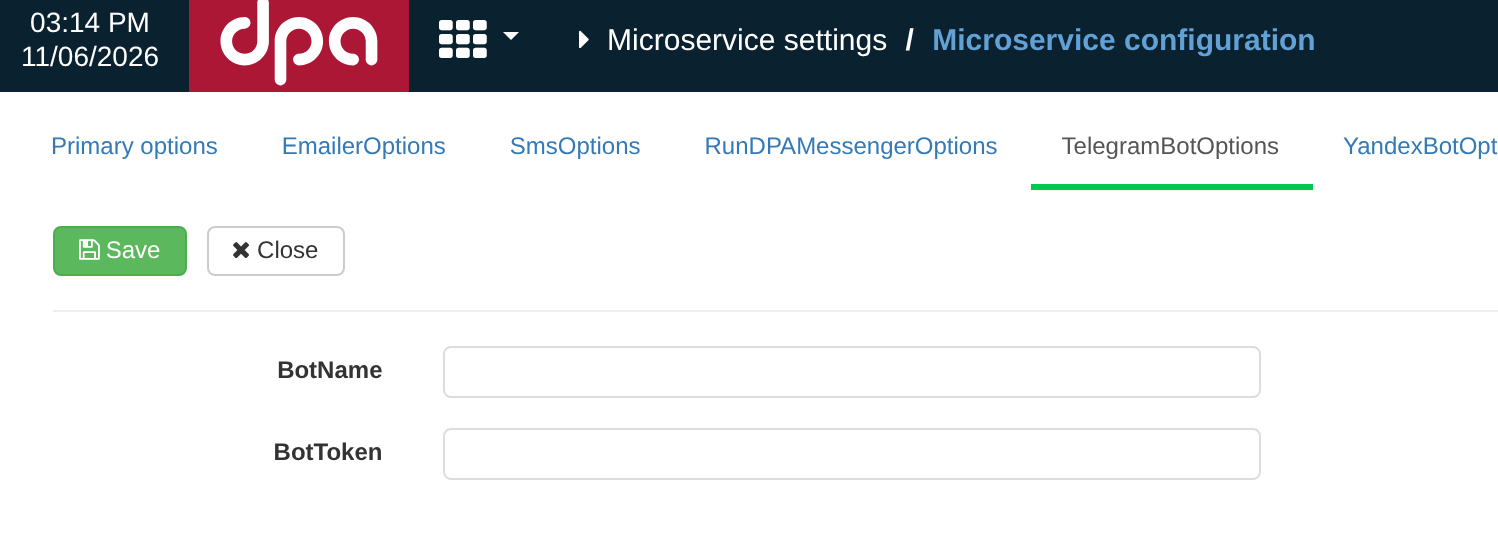
TelegramBotOptions contains the Telegram bot name and token. These parameters are used for local Telegram delivery and for connecting a user to the bot.
Telegram receives the text as the subject and body separated by a line break. If the message has attachments, they are not added as files to the original text message. Instead, the bot shows a control for obtaining the attachments; after it is used, Messenger sends the stored attachments as separate documents.
When UseRunDPAMessenger is enabled, Telegram delivery and user connection are performed through the upstream Messenger, so local Telegram-bot parameters are not the transport settings for that delivery.
Yandex
Yandex delivery uses a user contact of type Yandex Messenger whose value is the Yandex login. Local bot parameters are on YandexBotOptions.
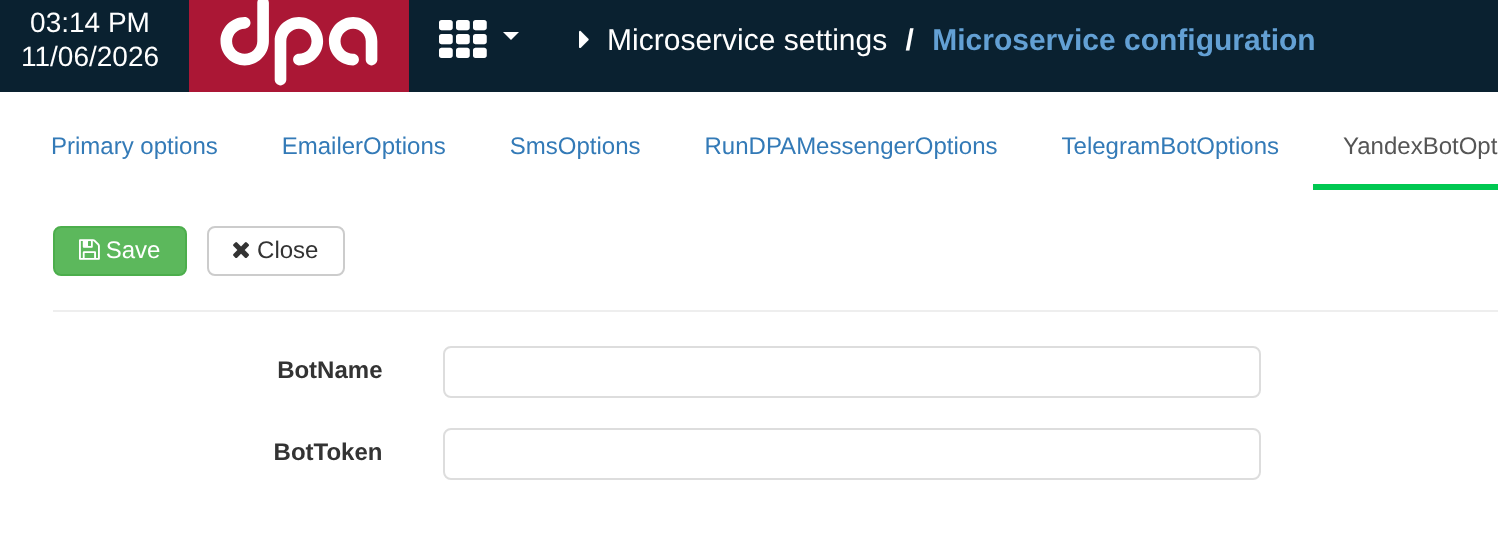
YandexBotOptions contains the name and token of the local Yandex bot. This transport remains local even when RunDPA Messenger is used.
Yandex is an exception to RunDPA Messenger mode: this transport is processed by the local Messenger even when UseRunDPAMessenger is enabled. Local bot parameters must therefore be configured for Yandex.
In the outgoing message, the subject is separated from the body. When attachments exist, Messenger adds a control for obtaining them. When files are requested, Messenger checks that the user’s Yandex login is actually present among the recipients of that message and only then sends the stored attachments.
As with the other external channels, Delivered means that the transport operation completed successfully, not that the user read the message.
Testing a transport manually
To test a channel without reproducing the original production event, open Applications menu → Messenger → Send message.
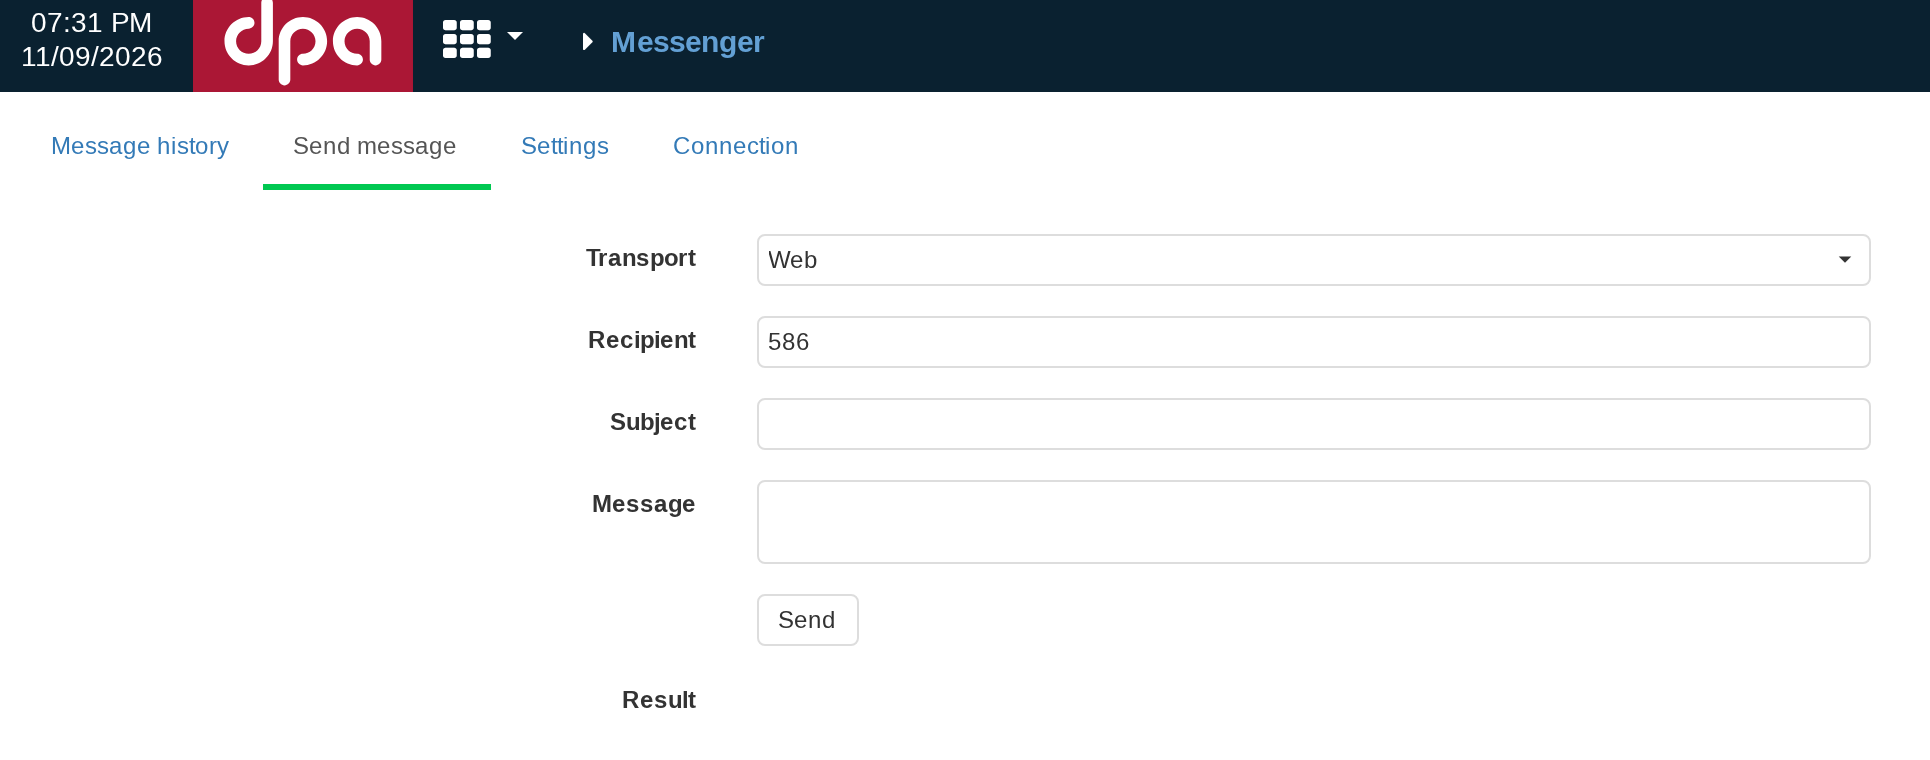
Send message tests a transport directly: Recipient contains the final address for the selected channel, while the result and created delivery can be compared with Message history.
The form contains Transport, Recipient, Subject, Message, and Result. Here Recipient is not a selection of a DPA User but the final address for the particular transport:
- for Sms notification — a phone number;
- for Email notification — an email address;
- for Telegram — a numeric
chat id; - for Yandex Messenger — a Yandex login;
- for Web — the numeric ID of a DPA user.
A test message uses the same active transport mode and Messenger settings as an ordinary message and is stored in Message history with source TestMessage. This form therefore lets you separate a transport problem from the event source, Message template, and user-contact selection.
After Send is clicked, the form waits for the final delivery result for some time and shows it in Result. If processing takes longer, check the final state in Message history.
For a practical external-channel test, use a controlled test address. If the test message already ends in an error, correct the connection or the parameters of the corresponding transport first; return to the Signal handler, Ticket, or another notification source only after the transport test succeeds.
7. Checking a message and troubleshooting missing delivery
When a notification is missing or incorrect, it is more useful to follow the same path as the message instead of checking every setting at once: source → template → user and contact → Messenger → transport → final result. Each step has an observable state that helps identify where the chain stopped.
First separate Messenger from the source
When it is unclear whether the delivery channel itself works, begin with a manual test. Open Applications menu → Messenger → Send message, select the required transport, enter the final recipient, subject, and text, and click Send.
For a safe internal test, use Web and the ID of your own DPA account. This send goes through the normal Messenger mechanism: the message and its delivery are stored in Message history, and a successful Web delivery creates a user notification. In the Source column, a test message is identified as TestMessage.
If a manual Web test ends with Delivered and the notification appears for the user, the basic Messenger chain is working. If an automatic notification from a Signal, Ticket, or another source is still missing, investigate before the transport — the event configuration, template, users, or contacts.
For an external transport, the manual form likewise tests the channel separately from the source. Its fields and final-addressing rules are described in section 6, “Messenger: external channels”. Recipient contains the final address directly: Email, phone number, Telegram chat id, or Yandex login. Such a test therefore does not check User selection or user-contact lookup in DPA Host. If manual sending works but automatic sending does not, check the source recipients and their contacts separately.
If the message is absent from Messenger history
First open Applications menu → Messenger → Message history in Messages view and find the event by time, Source, subject, or text.
If the message is absent, the chain did not reach the point where Messenger stores it. Check:
- whether the event for which a notification is expected actually occurred;
- whether the event matches the source configuration — for example the required Signal, filter, and Ticket stage;
- whether the required Message template and transport are selected in the source;
- whether recipient users are specified;
- whether these accounts are active: deleted and deactivated users are excluded while a notification is prepared;
- for an external transport, whether at least one contact of the required type exists.
The last point is important. DPA Host first builds a concrete recipient list and only then passes the message to Messenger. If no recipient address remains for a language group after users and their contacts are filtered, no message for that group is created in Messenger. A missing history row can therefore mean not only that the event did not fire but also that no recipient for the selected channel could be formed from the selected users.
Source helps verify which configuration actually created a message. A Signal notification shows the corresponding Signal, a Ticket notification uses the TicketNotification configuration, and a manual test uses TestMessage.
If the message exists but the expected delivery does not
Expand the message in Messages view or open Message properties and compare the recipient list with what you expect. The conversion of a User into concrete delivery addresses is described in section 3, “Recipients and user contacts”.
For Web, every active selected user should have a delivery to that account. For external channels, a delivery is created for every matching contact. Therefore:
- if the user is missing from external-channel deliveries, check that a contact of the required type exists;
- if one user has several deliveries, check whether several Email addresses, phone numbers, or other same-type contacts are stored for that user;
- if the wrong address is selected, correct the Value of the corresponding user contact;
- when Web is used, external contacts do not affect the result — check the selected account itself.
Do not look for this situation under Delivery errors: if DPA Host did not form a recipient address, no Messenger delivery exists and the transport has not run yet.
If the delivery remains queued
Queued means that the delivery has already been stored in Messenger but a final transport result has not yet been written. The delivery lifecycle is described in detail in section 5, “Queue, state, and delivery history”. Click Refresh and check whether the state changes.
If a delivery remains queued for a long time, first check the Messenger microservice and its connection to DPA Host. Stored queued deliveries are not lost on an ordinary Messenger restart: at startup, the service picks up Queued rows again and passes them for processing.
After Messenger or its transport is restored, first refresh history and inspect the existing delivery. It is not necessary to create the business event again merely to process a queue entry that has already been stored.
If the delivery ends with an error
For Error, expand the delivery and read Delivery error. This is the first place to look for the technical cause: a wrong address, unavailable external service, authentication failure, transport configuration problem, or another channel-specific failure.
Then repeat the check through Applications menu → Messenger → Send message using the same transport and final address.
- If the manual test ends with the same error, the problem belongs to the transport, its configuration, or the final address.
- If the manual test succeeds but the automatic notification is not created or produces another recipient, return to the source configuration and user contacts.
An errored delivery is not moved back to the queue by the general Messenger logic and has no separate Redo command. After fixing the cause, create a new send: trigger the source event again where appropriate, or perform a new manual transport test.
If the delivery is Delivered but the notification is not visible
Delivered means that the transport completed successfully, but it does not always confirm anything the final person did.
For Web, continue inside DPA; list and viewed-state behavior is described in section 4, “Web notifications”:
- make sure that the delivery belongs to the required user ID;
- sign in as that account and open Notifications;
- find the message body by time and text;
- remember that Viewed changes automatically when a page of the list is loaded.
For Email, SMS, Telegram, and Yandex, Delivered means that the corresponding transport operation completed without an error. It does not confirm that the user opened the email, saw the SMS, or read the messenger message. When DPA reports successful delivery, further verification depends on the external system and address used.
If the message arrived but its text is wrong
If the delivery was created for the correct recipient and the channel works, but the subject or body is wrong, check the Message template and source data rather than the transport. Tags and template localization are described in section 2, “Message templates and values from sources”.
{empty}in the text means that the source did not provide a value for the tag used or provided an empty string;- a wrong language requires checking the user’s language and the corresponding localization of the same Message template record;
- a wrong tag value requires checking the source-event context;
- a wrong recipient or channel belongs to source configuration and contacts, not template text.
Short diagnostic map
| Observation | Where to continue |
|---|---|
| The event occurred, but no message is present in Message history | Source, its conditions, template, user activity, and presence of suitable contacts. |
| The message exists, but the required delivery does not | Selected users and formation of addresses from their contacts. |
| The delivery remains Queued | Messenger availability and queue processing. |
| The delivery ends with Error | Delivery error, recipient address, and settings of the particular transport. |
| Manual transport test succeeds, automatic notification does not | Source, template, users, and contacts before Messenger. |
| A Web delivery is Delivered, but the user does not see a notification | Recipient user ID and Notifications for that exact account. |
| An external delivery is Delivered, but the person did not receive the message | Final address and external system; Messenger status does not confirm that a human read the message. |
| The message is delivered, but its text or language is wrong | Message template, source tags, and user localization. |
This sequence localizes the problem by its observable state without changing several layers of configuration at once. First determine the last step that the message reached successfully, then investigate the next level of the chain.